Wednesday, June 27, 2012

Bell Peppers


Varieties

Bell peppers can be found in a rainbow of colors and can vary in flavor. The variety of the pepper plant and the stage of the ripeness determine the flavor and color of each pepper. For example, a red bell pepper is simply a mature green bell pepper. As a bell pepper ages, its flavor becomes sweeter and milder. Red bell peppers contain eleven times more beta carotene than green bell peppers.

Selection

Bell peppers are available and are in good supply all year, but they are more plentiful and less expensive during the summer months. Fresh peppers come in variety of colors, shapes, and sizes, but when selecting them, they all follow the same guidelines. Their skin should be firm without any wrinkles, and the stem should be fresh and green. They should feel heavy for their size. Avoid peppers with sunken areas, slashes or black spots.

Storage

Store unwashed bell peppers in a plastic bag in the refrigerator. They will stay fresh for ab
out a week. Green bell peppers will stay fresh a little longer than the yellow and red ones.

Source: http://www.fruitsandveggiesmatter.gov/month/bell_pepper.html

Red Split Lentils With Cabbage (Masoor dal aur band gobi)


Serves 4 to 6


Ingredients:

  • 200 grams (1 1/4 cups) red split lentils (masoor dal), picked over, washed and drained
  • 1.2 liters (5 cups) water
  • 1/2 teaspoon ground turmeric
  • 5 tablespoons vegetable oil
  • 1 teaspoon cumin seeds
  • 2 to 4 cloves garlic, peeled and finely chopped
  • 1 medium onion, peeled and cut into fine slices
  • 225 grams (1/2 pound) cored and finely shredded cabbage
  • 1 to 2 fresh, hot green chilies, finely sliced
  • 1 1/2 teaspoons salt
  • 1 medium tomato, peeled (ahem, Deb did not peel her tomato) and finely chopped
  • 1/2 teaspoon peeled, finely grated fresh ginger

Directions:

Put the lentils and water into a heavy pot and bring to a boil. Remove any scum that collects at the top. Add the turmeric and stir to mix. Cover, leaving the lid very slightly ajar, turn heat down to low, and simmer gently for 1 1/4 hours. Stir a few times during the last 30 minutes.

When the lentils cook, heat the oil in a 20 to 23 centimeter (8 to 9 inch) frying pan over medium heat. When hot, put in the cumin seeds. Let them sizzle for 3 to 4 seconds. Now put in the garlic. As soon as the garlic pieces begin to brown, put in the onion, cabbage and green chilies. Stir and fry the cabbage mixture for about 10 minutes or until it begins to brown and turn slightly crisp. Stir in 1/4 teaspoon of the salt. Turn off the heat under the frying pan.

When the lentils have cooked for 1 1/4 hours, add the remaining 1 1/4 teaspoon salt, the tomato and ginger to the pot. Stir to mix. Cover and cook another 10 minutes. Add the cabbage mixture and any remaining oil in the frying pan. Stir to mix and bring to a simmer.
Simmer uncovered for 2 to 3 minutes or until the cabbage is heated through.

Source: http://www.mealsmatter.org/recipes-meals/recipe/39458

Couscous and Feta-Stuffed Peppers


Ingredients:

  • Vegetable-oil cooking spray
  • 1 1/4 cups fat-free chicken or vegetable broth
  • 2/3 cup couscous
  • 4 extra-large or 5 large bell peppers, mixed colors
  • 2 tsp olive oil
  • 1/2 cup chopped onion
  • 6 oz zucchini, quartered lengthwise then sliced across thinly
  • 6 oz yellow squash, quartered lengthwise then sliced across thinly
  • 1/2 tsp fennel seeds
  • 1/2 tsp dried oregano
  • 1/2 tsp salt
  • 1 cup cherry tomatoes, cut in half
  • 15 oz canned chickpeas, drained and rinsed
  • 4 oz crumbled feta cheese (about 1 cup)
  • 3 tablespoons tomato paste

Directions:

Preheat oven to 350°F. Coat a small baking dish with cooking spray. Bring the broth to a boil in a saucepan, add the couscous, cover the pan and remove it from the heat. Cut the stems and top half inch off the bell peppers and scoop out the seeds and membranes. Place peppers upright in a baking dish and roast them for 15 minutes or so, until they soften, then remove them from the oven until the filling is ready. Heat oil in a nonstick skillet. Add onion, zucchini, yellow squash, fennel seeds, oregano, and salt. Cook, stirring frequently, for 5 minutes or until vegetables are softened. Remove from heat and stir in the tomatoes, chickpeas and tomato paste. Using a fork, scrape the couscous into the skillet and toss with the vegetables. Stir in the crumbled feta. Fill peppers with the couscous mixture. Bake 15 minutes. Serve immediately.


Orzo Salad with Celery, Radishes, and Dill


8 side-dish servings

Ingredients
  • 2 cups orzo (rice-shaped pasta)
  • 1 1/2 cups very thinly sliced celery (about 3 stalks)
  • 1 pint grape tomatoes, halved
  • 1 bunch radishes, trimmed, thinly sliced
  • 2/3 cup chopped fresh dill
  • 5 tablespoons olive oil
  • 4 tablespoons white balsamic vinegar
  • 1 cup (about 5 ounces) crumbled soft fresh goat cheese (preferably with four peppers)
Preparation
  • Cook orzo in large pot of boiling salted water until tender but still firm to bite, stirring occasionally. Drain. Rinse under cold water; drain. Transfer to large bowl; add celery, tomatoes, radishes, and dill.
  • Whisk oil and vinegar in small bowl. Season with salt and pepper and pour over salad; toss to coat. Season salad with salt and pepper. Fold in half of goat cheese. Sprinkle remaining cheese over and serve.
  • PREP: 25 minutes
  • TOTAL: 25 minutes

Spaghetti with Radicchio and Ricotta


Ingredients
  • 1 pound spaghetti
  • 8 ounces fresh ricotta cheese
  • 2 tablespoons extra-virgin olive oil
  • Coarse salt
  • 3 garlic cloves, minced
  • 1/2 cup finely chopped fresh flat-leaf parsley
  • 1/2 cup plain breadcrumbs, preferably homemade
  • 1 head radicchio, quartered, cored, and thinly sliced crosswise
  • Freshly ground pepper
Directions

Heat 1 tablespoon oil in a medium skillet over medium heat. Add garlic, and cook until soft but not browned, 1 to 2 minutes. Add parsley and breadcrumbs; cook, stirring frequently, until breadcrumbs are golden, about 3 minutes. Transfer to a bowl, and set aside.

Bring a large pot of water to a boil, and add salt. Add pasta, and cook until al dente according to package instructions. Drain, reserving 1 cup cooking liquid. Return pasta and reserved cooking liquid to pot, and add ricotta and remaining tablespoon oil. Toss to coat evenly. Add radicchio and half the breadcrumb mixture; season with salt and pepper. Toss to combine. Serve immediately, sprinkled with remaining breadcrumb mixture

Veggie Detox


2 servings


  • TOTAL TIME: 15 minutes

Ingredients

  • 2 firm Bosc pears, stemmed, cut into wedges
  • 1 3/4-inch piece peeled fresh ginger
  • 5 medium carrots, scrubbed (about 1/2 pound), cut into 2- to 3-inch pieces
  • 2 celery stalks, trimmed, cut into 2- to 3-inch pieces
  • 1 baby beet, trimmed, scrubbed
  • 1/2 cup (packed) fresh Italian parsley (stems and leaves)
  • 2 teaspoons fresh lemon juice
  • special equipment

    Juice extractor

Preparation

  • Push pears and ginger through juice extractor. Working in batches, push carrots, celery, beet, and parsley through juice extractor. Stir in lemon juice. Divide between two 8-ounce glasses and serve.


Read More http://www.bonappetit.com/recipes/2011/01/veggie_detox#ixzz1z1Chq4iy

What is Radicchio?

Radicchio is an Italian salad plant related to chicory. The distinctive plant grows in a rich maroon color with white veins and has a peppery flavor that adds a textural bite to salads. Radicchio is sometimes grilled or roasted, making a pleasant counterpoint to other grilled vegetables. It is growing in popularity and can be found in most produce sections. Radicchio has been in cultivation in the Mediterranean for hundreds of years and is used in a variety of Mediterranean dishes.

Radicchio resembles lettuce most in appearance, although it is not in the lettuce family. It forms tight heads of leaves furled around a central core and grows low to the ground. Radicchio makes a startling splash of color in the garden, and its natural bitterness makes it less subject to depredation by garden pests.

When picking out radicchio in the grocery store, look for larger heads with looser outer leaves. Tight small heads have probably been excessively handled and may have drier cores. Radicchio can keep under refrigeration for one week, and the leaves should be rinsed before use.

To grow radicchio, plant seeds or seedlings in early spring and late fall, because the plant prefers cooler temperatures. It has a shallow root system, and therefore prefers frequent light watering to saturation. Plant radicchio eight to ten inches (20 to 25 centimeters) apart to allow the plants room to form heads. Radicchio will mature in approximately 80 days. Harvest with a sharp knife and remove the roots from the soil before preparing it for the next crop.

For grilling or baking, radicchio leaves can be wrapped whole around other produce items or meats, or prepared separately. If grilling separately, quarter the heads lengthwise, sprinkle them in olive oil and salt for flavor, and grill until the core is tender and the outer leaves brown, which may take approximately 30 minutes with occasional rotations. Sprinkle with asiago or another cheese directly before serving. Grilled radicchio can be made sweeter by mixing it with sweet onion or another caramelizing vegetable.

In salads, be aware that radicchio's bitter flavor is distasteful to some consumers, so it should not be used to excess unless guests are familiar with chicory and other bitter greens. It makes a bright addition to a green salad, standing out with its excellent maroon color and peppery flavor. It does, however, brown easily, and should not be chopped too early.

Source: http://www.wisegeek.com/what-is-radicchio.htm

Monday, June 25, 2012

Zucchini Carpaccio Salad


Ingredients:

1 1/2 pound zucchini (about 3 large)*
1 1/4 teaspoons salt
1/2 pound arugula, stems discarded and leaves cut into 1/2-inch-wide strips (6 cups)
1 ounce Parmigiano-Reggiano, coarsely grated (on large holes of a box grater; 1/2 cup)
3 tablespoons extra-virgin olive oil
Juice of one lemon
1/4 teaspoon black pepper

Cut zucchini crosswise into paper-thin slices with slicer. Toss zucchini slices with one teaspoon salt in a large colander set over a bowl and let drain 20 minutes.
Rinse zucchini slices well, then drain, pressing gently on slices to extract any excess liquid. Pat zucchini slices dry with a kitchen towel.
Put arugula greens in a large bowl. Sprinkle with 1/4 cup Parmigiano-Reggiano and remaining 1/4 teaspoon salt. Drizzle 1 1/2 tablespoons of oil over greens and toss. Arrange zucchini slices over arugula greens, then drizzle with remaining oil, lemon juice and sprinkle with remaining 1/4 cup Parmigiano-Reggiano and pepper.
* A delicious and colorful variation could include yellow summer squash, as well.


Stewed Lentils and Tomatoes

Ingredients:
2 teaspoons good olive oil
2 cups large-diced yellow onions (2 onions)
2 cups large-diced carrots (3 to 4 carrots)
1 tablespoon minced garlic (3 cloves)
1 (28-ounce) can whole plum tomatoes
1 cup French green lentils (7 ounces)
2 cups vegetable or chicken broth
2 teaspoons mild curry powder
2 teaspoons chopped fresh thyme leaves
2 teaspoons kosher salt
1/4 teaspoon freshly ground black pepper
1 tablespoon red wine vinegar
Heat the oil in a large saucepan. Add the onions and the carrots and cook over medium-low heat for 8 to 10 minutes, until the onions start to brown. Stir occasionally with a wooden spoon. Add the garlic and cook for one minute more.
Meanwhile, place the canned plum tomatoes, including the juice, in the bowl of a food processor fitted with a steel blade and pulse several times until the tomatoes are coarsely chopped. Rinse and pick over the lentils to make sure there are no stones in the package.

Add the tomatoes, lentils, broth, curry powder, thyme, salt and pepper to the pan. Raise the heat to bring to a boil, then lower the heat and simmer covered for about 40 minutes, until the lentils are tender. Check occasionally to be sure the liquid is still simmering. Remove from the heat and allow the lentils to sit covered for another 10 minutes. Add the vinegar, season to taste and serve hot.

Broccoli Parmesan Fritters


Ingredients:
8 ounces (1 small-to-medium bundle, 225 grams) fresh broccoli (3 cups chopped)
1 large egg
1/2 cup (65 grams) all-purpose flour
1/3 cup (30 grams) finely grated parmesan cheese
1 small clove garlic, minced
1/2 teaspoon Kosher salt, plus more to taste
A pinch of red pepper flakes or several grinds of black pepper
Olive or vegetable oil for frying

Prepare your broccoli: Separate the florets from the biggest stem(s). Cut the florets into 1-inch chunks.
To prepare the stems, I like to peel them, as the skin can be thick and doesn’t cook quickly, then slice them into 1/2-inch lengths. You should have about 3 cups of chopped broccoli total.
Steam your broccoli until tender but not mushy: Use whatever method you prefer. My quickie, lazy method is to bring a 1/2-inch or so of water to a boil in a small saucepan, then add the broccoli, place a lid on it and simmer it for 5 to 6 minutes.
Drain the broccoli, then set it aside to cool slightly.
In the bottom of a large bowl, lightly beat your egg. Add the flour, cheese, garlic, salt and pepper. Then, add the somewhat cooled broccoli and, using a potato masher, mash the broccoli just a bit. You’re looking to keep the bits recognizable, but small enough (1/4- to 1/2-inch chunks) that you can press a mound of the batter into a fritter in the pan. Once mashed a bit, stir or fold the ingredients together the rest of the way with a spoon. Adjust seasonings to taste.
Heat a large, heavy skillet over moderate heat. Once hot, add a good slick of oil (I usually use a mix of olive and vegetable oil), about 2 to 3 tablespoons. Once the oil is hot (you can test it by flicking a droplet of water into it; it should hiss and sputter), scoop a two tablespoon-size mound of the batter and drop it into the pan, then flatten it slightly with your spoon or spatula. Repeat with additional batter, leaving a couple inches between each. Once brown underneath, about 2 to 3 minutes, flip each fritter and cook on the other side until equally golden, about another 1 to 2 minutes.

Transfer briefly to paper towels to drain, then to a serving plate if you’ll be eating them shortly or a baking sheet in a 200 degree oven if you’d like to keep them warm for a while until needed. Repeat with remaining batter, adding more oil as needed. Serve with some of the suggestions listed in the head notes, above.

Cantaloupe Bread with Praline Glaze

Ingredients

  • 3 eggs
  • 1 cup vegetable oil
  • 2 cups brown sugar
  • 1 tablespoon vanilla extract
  • 2 cups cantaloupe - peeled, seeded and pureed
  • 3 cups all-purpose flour
  • 1 teaspoon salt
  • 1 teaspoon baking soda
  • 3/4 teaspoon baking powder
  • 2 teaspoons ground cinnamon
  • 1/2 teaspoon ground ginger
  •  1/2 cup butter
  • 1 2/3 cups brown sugar
  • 1/2 cup chopped pecans
  • Directions

    Preheat oven to 325 degrees F (165 degrees C). Lightly grease and flour two 9x5 inch loaf pans.
    In a large bowl, beat together eggs, vegetable, sugar, vanilla and cantaloupe. In a separate bowl, sift together flour, salt, baking soda, baking powder, cinnamon and ginger. Stir flour mixture into cantaloupe mixture; stir to combine. Pour batter into prepared pans.

Bake in preheated oven for 1 hour, until a toothpick inserted into center of a loaf comes out clean. Meanwhile, combine margarine and brown sugar. Microwave for 3 minutes, stirring at 1 minute intervals; mix in pecans. Pour sauce over warm bread. Let cool for 1 hour before serving.

Vegan Garden Loaf with Maple Apricot Glaze

Ingredients:

Extra virgin olive oil
1 cup chopped onion- red or sweet
2 heaping cups chopped Baby Bella or Cremini mushrooms
2 cloves garlic, minced
1 tablespoon balsamic vinegar
5 cups loosely packed baby spinach leaves
Sea salt and ground pepper
1 cup cooked quinoa
1 cup toasted gluten-free bread or waffle crumbs
2 tablespoons Annie's Organic Ketchup
2 tablespoons molasses
1 tablespoon good olive oil
1 tablespoon dried Italian Herb Mix- basil, thyme, oregano, parsley, marjoram
1 teaspoon fresh minced rosemary
3-4 scallions (spring onions) sliced thin, white to light green section
1 baked sweet potato, peeled, diced (take it out before it's cooked too much, not too soft)
Maple Apricot Glaze:

1/4 cup no-sugar apricot fruit spread
1 tablespoon balsamic vinegar
1 tablespoon maple syrup
A sprinkle of cinnamon and cumin
Hot red chili flakes, to taste

Instructions:

Preheat the oven to 350ºF. Lightly oil a glass bread loaf pan.  

Or-- my latest tip is to line the bottom of the pan with a piece of parchment paper that extends up above the longer sides. When the loaf has baked, and set a bit, lift out the loaf in one whole piece.

Heat the olive oil in a skillet and cook the onion until it is translucent. Add the mushrooms and garlic; stir until softened. Add the balsamic vinegar and stir. Add the spinach. Season with sea salt and ground pepper. Stir and cook down until the mixture is soft- about seven minutes or so.

Spoon the skillet vegetables into a food processor bowl and pulse to make a grainy mixture. Don't over-process it, you want some texture.

Dump the mixture into a large bowl. Add the cooked quinoa, gluten-free breadcrumbs, ketchup, molasses and olive oil and stir to combine. Add in your dried herbs, rosemary, scallions, and mix to distribute. You want a moist mixture that sticks together when you press it with a spoon. if you need more ketchup to hold it together, add it now, maybe a tablespoon.

Last- add in the diced sweet potato and fold in gently.

Spoon the loaf mixture into the oiled loaf pan and shape it with moist fingers, pressing it tight into the pan. Smooth the top.

Make your glaze.

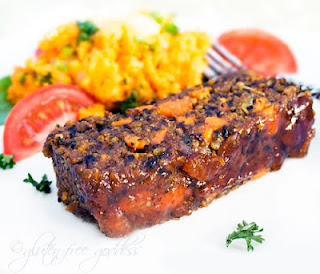
Pour the glaze all over the top of the loaf.

Tent loosely with a piece of foil. Bake in the center of a preheated oven until heated through and the edges of the glaze are bubbling- about 25 to 30 minutes.


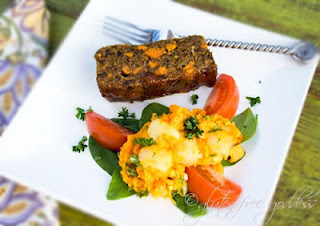
Allow the loaf to set for ten minutes, tented with foil. This helps it to settle, and makes it easier to slice. Slice into portions and lift out with thin spatula. It should hold together.
Makes six slices.

Wrap and store leftovers in the fridge.


Read more: http://glutenfreegoddess.blogspot.com/2009/05/garden-loaf-with-maple-apricot-glaze.html#ixzz1ypX2xH8r

Thursday, June 14, 2012

Rustic Red Kale and White Bean Soup


You can substitute any other leafy green for the kale, but if you’re using quick-cooking greens such as spinach, allow the soup to cook for 25 minutes before adding the greens; then add the greens and cook just until they’re done.


Ingredients

  • 1 bunch red kale (or use any other green available)
  • 1 large onion, chopped
  • 3 ribs celery, chopped
  • 4 cloves garlic, minced
  • 1/2 cup parsley, chopped
  • 1/2 cup chopped fresh basil (or about 5 “ice cubes” of frozen basil)
  • 1 teaspoon dried oregano
  • 2 15-ounce cans diced tomatoes
  • 1 15-ounce can cannellini or other white beans
  • 4 cups water
  • pinch red pepper flakes
  • salt and pepper to taste
  • Optional serving suggestions: Balsamic vinegar and soy parmesan

Instructions

  1. Prepare the kale by removing the thick parts of the center rib and discarding them. Slice the leaves thinly. Measure out 4 cups of kale for the soup; save the rest for another use.
  2. Heat a large, non-stick pot over medium-high heat. Add the onion and celery and cook until the onion begins to brown, adding water by the tablespoon if needed to prevent sticking. Add the garlic, and sauté for another minute. Add all the remaining ingredients, and allow the soup to simmer, adding extra water as needed, until the kale is tender, about 30-60 minutes, depending on the kale. Taste the soup and add more basil, if necessary.
  3. Serve the soup, stirring a few drops of balsamic vinegar and a sprinkling of vegan parmesan into each bowl, if desired. Makes about 6 servings.
Preparation time: 15 minute(s) | Cooking time: 50 minute(s)
Number of servings (yield): 6
Each serving contains: 152 Calories (kcal); 1 g Total Fat; (5% calories from fat); 9 g Protein; 30 g Carbohydrate; 0 mg Cholesterol; 258 mg Sodium; 7 g Fiber

Source: http://blog.fatfreevegan.com/2007/02/rustic-red-kale-and-white-bean-soup.html

Wednesday, June 13, 2012

Green Banana Smoothie

Ingredients (serves 2)


3 Cups of Spinach or any other leafy green
1.5 frozen banana chunks
1/2 teaspoon of cinnamon
2 cups of water
1/2 teaspoon of raw honey or any other sweetner

Directions

Combine all the ingredients in a blender, spinach on top, and blend until smooth. Add water or ice to thin or thicken as desired. Optionally, toss
in a teaspoon of chia seeds for some healthy omega-3's and a creamy texture.


Blackberries


Sweet, succulent blackberries are summer delicacies in the northern temperate regions. As in raspberries, they grow on shrubs known as brambles in the vast rosaceae family bush berries. The plant is native to Europe and now grown at a commercial scale from North America, particularly in the USA, to as far as Siberia.
Binomially, the plant is a small perennial shrub belonging to the familyRosaceae, of the genus: Rubus. Botanical name: Rubus fruticosus. 


Health benefits of blackberries


  • As in other bush berries, blackberries too are packed with numerous plant nutrients such as vitamins, minerals, anti-oxidants, and dietary fibers that are essential for optimum health.
  • They are very low in calories. 100 g berries provide just 43 calories. Nonetheless, rich in soluble and insoluble fiber (100 g whole berries consist of 5.3 g or 14% RDA of fiber).Xylitol, a low-calorie sugar substitute presents in the fruit fibers, absorbs more slowly than sugar, and does not contribute to high blood sugar levels.
  • Blackberries have significantly high amounts of phenolic flavonoid phytochemicals such as anthocyanins, ellagic acid tannin), quercetin, gallic acid, cyanidins, pelargonidins, catechins, kaempferol and salicylic acid. Scientific studies show that these antioxidant compounds may have potential health benefits against cancer, aging, inflammation, and neurological diseases.
  • Fresh berries are an excellent source ofvitamin C(35% of RDA/100 g), which is a powerful natural antioxidant. Consumption of fruits rich in vitamin C helps develop resistance against infectious agents, counter inflammation, and scavenge harmful free radicals from the body.
  • They contain adequate levels of vitamin A, vitamin E, and vitamin K (16% of RDA/100 g) and in addition, they are rich in many other health promoting flavonoid poly-phenolic antioxidants such as lutein, zeaxanthin, and ß-carotene in small amounts. Altogether, these compounds help act as protective scavengers against oxygen-derived free radicals and reactive oxygen species (ROS) that play a role in aging and various disease process.
  • Blackberries have an ORAC value (oxygen radical absorbance capacity, a measure of anti-oxidant strength) of about 5347µmol TE per 100 grams.
  • Further, blackberries contain good amount of minerals like potassium, manganese, copper, and magnesium. Copper is required in the bone metabolism as well as in production of white and red blood cells.
  • They contain moderate levels of B-complex group of vitamins. It contains very good amounts of pyridoxine, niacin, pantothenic acid, riboflavin, and folic acid. These vitamins are acting as cofactors help body metabolize carbohydrates, proteins, and fats.

 Read more at: http://www.nutrition-and-you.com/blackberries.html


Orecchiette with Cherry Tomatoes and Arugula

Serves at least 2
  • 2 tablespoons olive oil
  • 2 cloves of garlic, minced
  • 2 small shallots, finely chopped
  • 1 pint mixed red and yellow cherry tomatoes, quartered
  • Cooked fresh orecchiette (approx. 2 cups dry but I did not measure)
  • 2 cups fresh arugula, de-stemmed, roughly chopped
  • Salt and pepper
  • Freshly grated parmesan reggiano

Heat olive oil in a large pan over medium heat, adding garlic and shallots, sauteing until soft but not browned. Add chopped cherry tomatoes, cooking for just a few minutes, until they have softened but not lost completely lost their form. Add pasta, reheating it in the sauce and seasoning with salt and pepper. Add the arugula, stirring it until it has just wilted. Serve immediately with freshly grated parmesan and, in our case, a glass of Cotes du Rhone.

Thai Coconut Tapioca Pudding with Cayenne-Spiced Mango

Thai Coconut Tapioca Pudding with Cayenne-Spiced MangoIngredients
  • 1 2x1-inch piece fresh ginger, peeled, sliced
  • 1 1x1-inch piece fresh galangal,* peeled, sliced
  • 10 Thai basil leaves*
  • 6 fresh cilantro sprigs
  • 2 kaffir lime leaves* or 2 teaspoons grated lime peel
  • 1 tablespoon sliced lemongrass*
  • 2 cups water
    2 cups whole milk
  • 1/2 cup sugar
  • 1/2 cup small pearl tapioca* (not quick-cooking) 1 13.5- to 14-ounce can unsweetened coconut milk*
  • 1 large mango, peeled, cut into cubes
  • 1 tablespoon fresh lime juice
  • Pinch of cayenne pepper


Directions
  • Combine first 6 ingredients in food processor; blend 20 seconds. Transfer to medium saucepan; add 2 cups water and bring to boil. Remove pan from heat and let steep uncovered 20 minutes. Pour mixture into strainer set over heavy large saucepan; press on solids to release flavored liquid. Discard solids in strainer.
  • Add milk and sugar to flavored liquid in pan; bring to boil. Stir in tapioca; return to boil. Reduce heat to medium and simmer uncovered until pudding thickens and is reduced to 2 1/4 cups, stirring frequently, about 35 minutes. Stir in coconut milk (pudding will be runny). Transfer to bowl. Cover and refrigerate overnight.
  • Toss mango cubes, lime juice, and cayenne in medium bowl. Divide tapioca among 6 stemmed glasses or bowls. Top with mango mixture; garnish with basil sprigs.

*Galangal, Thai basil, kaffir lime leaves, lemongrass, small pearl tapioca, and unsweetened coconut milk are available at Asian markets.


Read More http://www.epicurious.com/recipes/food/views/Thai-Coconut-Tapioca-Pudding-with-Cayenne-Spiced-Mango-233724#ixzz1xhX3hfWo


Read More http://www.epicurious.com/recipes/food/views/Thai-Coconut-Tapioca-Pudding-with-Cayenne-Spiced-Mango-233724#ixzz1xhWD9zed


Salad with New Potatoes and Pickled Spring Onions

  • 2 pounds small new or fingerling potatoes (I used a mix of reds and yukon golds)
  • 1 pound asparagus
  • 1/4 pound sugar snap peas, green beans or other spring pea
  • 4 small-to-medium radishes, thinly sliced
Pickled Spring Onions
  • 3 spring onions (about 6 ounces)
  • 1/4 cup white wine vinegar
  • 1/4 cup water
  • 1 tablespoon kosher salt (I use Diamond brand; use less if you’re using Morton or table salt)
  • 1 1/2 teaspoons sugar
Sharp Mustard Vinaigrette
  • 1/4 cup olive oil
  • 2 tablespoons whole grain mustard (both Roland and Maille make a whole seed one I’m tremendously fond of)
  • 2 teaspoons smooth Dijon mustard
  • 2 tablespoons white wine vinegar
  • Salt and freshly ground black pepper to taste
Place potatoes in a medium saucepan and cover with one inch of water. Bring to a boil and cook for about 15 minutes, or until the tip of a knife easily pierces through a potato. Drain the potatoes and let them cool until they’re almost room temperature. You can hasten this by covering them with cold water, and replacing the water a few times as it warms up.

Meanwhile, pickle your spring onions. Whisk vinegar, water, salt and sugar together in the bottom of a small container with a lid until the salt and sugar dissolve. Slice the bulbs and paler green parts into very thin coins and submerge them in the vinegar mixture. Cover and put in fridge until you’re ready to use them; if you can put them aside for an hour or even overnight, even better. Reserve the onion greens.
Refill the saucepan you used for the potatoes (here’s to fewer dishes!) with salted water and bring it to a boil. Prepare an ice bath, a large bowl with ice and water in it. Trim the tough ends off the asparagus. Once the water is boiling, add the asparagus. One minute later, add the sugar snap peas. Two minutes later, drain both together then dump them in the ice bath until chilled. Drain the vegetables and spread them out on towel to absorb excess water.

Slice the cooked asparagus spears and sugar snaps into 1/2-inch segments and place them in a large bowl. Chop potatoes into moderate-sized chunks and add them to the bowl. Cut the radishes as thinly as possible, with a mandoline if you have one. If they’re especially big (mine were), you can first quarter them lengthwise. Cut some of the reserved onion greens into thin slivers (no need to use all of them, as the onion flavor might take over) and add them to the bowl.


When you’re ready to serve the salad, or an hour or two in advance, whisk the dressing ingredients and toss it with the vegetables, to taste. (You may find you don’t want to use all of it.) Stir in as many pickled onion coins as you please, save the rest for anything and everything. Season with salt and freshly ground black pepper, o taste. Eat and enjoy!.

Pluot Raspberry Pie


Weird things happen when a boy plum tree falls in love with a girl apricot tree. Their children produce strange looking fruit with tannic tasting skin and pretty red hued flesh. Unlike an American marriage where the female often takes the last name of the male, the plum tree and apricot tree keep their names, but combine them together for their spotty fruit offspring.

Or maybe pluots are just a crazy cross pollination idea from the brain of Floyd Zaiger, a Modesto California fruit breeder. At least he named them something fun, “Ploooooo-ought” rolls off the tongue like an odd foghorn, and is much more exciting to say than “aprium”.

So it’s come to be, the fruit with the silly name jumps into my Costco cart. Not having a clue what to do with these strange love children, I baked them into a pie, throwing in a cup of raspberries for brightness.

The result is a puckery sweet tart pie with a beautiful red color. Perfect with a cup of coffee for breakfast.

Ingredients
3 cups skinned and thickly sliced ripe pluots (About 5 or 6 )
1 cup fresh or frozen raspberries
1/3 cup cornstarch
1 cup granulated sugar
1 Tablespoon butter, cut into small pieces
1 box purchased pie crusts, or make your own double crust
1 egg white
1 (9 inch) pie dish, not the deep dish kind

Instructions
1. To remove the skins: Bring a pot with enough water to cover the pluots to a boil. Set aside a large bowl of ice water. Drop the pluots in the water for about 30 seconds and move to the ice water for a couple of minutes.

2. Pre-heat the oven to 400 degrees.

3. Thickly slice the pluots into a large bowl. Add the frozen raspberries. Stir together the cornstarch and sugar in a separate bowl. (If you don’t do this you’ll have starch clumps). Add the sugar mixture to the fruit and mix gently. Set aside.

4. Roll out the pie crusts just slightly between two sheets of wax paper. This will make them prettier. Transfer one to the pie dish and brush completely with a little egg white mixed with a small splash of water. Pour in the fruit, dot with butter if desired, and top with the second crust. Press the edges together and flute the pie tucking the edges into the pie dish. Poke some holes in the top of the dough the pie with a knife to vent.

5. Bake the pie for 30 minutes. Then turn the heat down to 375 degrees and bake for 30 more minutes or until the bottom of the crust looks lightly browned. You can use a pie shield after the first 30 minutes of baking so the edges don’t burn. Also, sticking a foil covered baking sheet under the pie during the last 30 minutes will help with any run over.

Recipe by Laura Flowers

Pluots

Current Facts
Pluot is the registered trademark name given to a stonefruit that was developed by Floyd Zaiger of Zaiger Genetics in 1989. Zaiger developed the original pluot from a plum and apricot variety. Zaiger develops all of his hybrid fruits by hand pollination versus genetic modification. The attention and care taken to create a pluot from parent varieties is painstakingly precise and even artful. Floyd Zaiger created the original pluots under extreme temperature control, transferring pollen from one fruit to the next with a tweezers fit for a lab. Dino Egg is also a trademarked name given to this specific pluot, which by virtue of the complex hybridization process becomes its own individual variety.

Description/Taste
Dino Egg pluots are one of the more unique pluots. Pluots, in general, have the appearance of a plum, are extremely sweet low-acid fruits with a juicy, tender firm flesh. The Dino Egg is a sub-acid pluot with a thin, smooth green speckled purple skin that clings to its juicy, firm, ruby-colored pitted flesh with flavors both sweet and bright.

Applications
Pluots pair well with pork, lamb and crudo-style fish and shellfish. They make delicious compotes, ice creams and reductions. Complimentary flavors are vanilla, nutmeg, tropical fruits, citrus and chile. To store fresh plums, refrigerate ripe fruit only a few days.

Geography/History
Pluots are the result of grafting apricot trees onto plum tree rootsock. The ratio of hybridization is generally 70% plum and 30% apricot, though it could be 60% plum and 40% apricot, so the rule of thumb is more plum than apricot. The result is a fruit which draws on the best qualities of its parents to create a fruit that is perhaps better than its origins - much like technology, improving upon its previous carnation. Pluots thrive in regions such as the San Joaquin Valley, where winter time temperatures are cool but not cold and the summer season is long, warm and dry.
Source: http://www.specialtyproduce.com/produce/Pluots_747.php

Pesto With Arugula

Ingredients
  • 1 1/2 cups baby arugula leaves
  • 1 1/2 cups fresh basil leaves
  • 2/3 cup pine nuts
  • 8 cloves garlic
  • 1 (6 ounce) can black olives, drained
  • 3/4 cup extra virgin olive oil
  • 1/2 lime, juiced
  • 1 teaspoon red wine vinegar
  • 1/8 teaspoon ground cumin
  • 1 pinch ground cayenne pepper
  • salt and pepper to taste

Directions

  • Place the arugula, basil, pine nuts, garlic, and olives in a food processor, and chop to a coarse paste. Mix in olive oil, lime juice, vinegar, cumin, cayenne pepper, salt, and pepper. Process until well blended and smooth.

Recipe found at: http://allrecipes.com/recipe/pesto-with-arugula/

Baby Bok Choy with Cashews

Baby Bok Choy with CashewsIngredients (Servers 4)

  • 2 Tbsp olive oil
  • 1 cup chopped green onions, including green ends
  • 3 cloves garlic, chopped
  • 1 pound baby bok choy, rinsed, larger leaves separated from base, base trimmed but still present, holding the smaller leaves together
  • 1/2 teaspoon dark sesame oil
  • Salt
  • 1/2 cup chopped, roasted, salted cashews

Method

baby-bok-choy-cash-1.jpg baby-bok-choy-cash-2.jpg
1 Heat olive oil in a large sauté pan on medium high heat. Add onions, then garlic, then bok choy. Sprinkle with sesame oil and salt. Cover, and let the baby bok choy cook down for approximately 3 minutes. (Like spinach, when cooked, the bok choy will wilt a bit.)
2 Remove cover. Lower heat to low. Stir and let cook for a minute or two longer, until the bok choy is just cooked.
3 Gently mix in cashews.

Recipe found at: http://www.simplyrecipes.com/recipes/baby_bok_choy_with_cashews/

Top 10 Ways to Enjoy Honeydew Melon

1.       Freeze It. Make popsicles by pureeing honeydew with a little sugar and a splash of lime juice. Pour into molds and freeze.

2.       Drink It. Make a slushy with your honeydew. Watch Recipe Video.

3.       The Perfect Pyramid. Place a peeled slice of honeydew on a plate. Pile on slices of banana and your favorite berries. Top with a scoop of low-fat frozen yogurt and a sprinkle of chopped peanuts for a scrumptious dessert.

4.       A Sweet Green Salad. Add melon to a green salad for sweet bursts of flavor.

5.       Melon Salsa. Mix melon with finely chopped red onion, fresh cilantro and a squeeze of lime juice for a fresh salsa that pairs well with seafood.

6.       Melon Salad. Honeydew, cantaloupe and watermelon mix well for a beautiful and delicious fruit salad. Drizzle with maple syrup and spice with shavings of ginger root.

7.       Kebab It! Thread cubes of melon and other favorite fruit on bamboo skewers. Serve with a yogurt dip.

9.       Fill It. Use the hull of a honeydew melon as a bowl and fill it with cold melon soup on a hot day.

10.   Wrap It Up. Wrap slices of melon with prosciutto (ham) for a delicious appetizer.

11.   Wash, Slice and Peel! Enjoy melon by itself for a taste just the way nature intended.

Monday, June 11, 2012

Escarole Salad with Parmesan Dressing

Ingredients

  • 1/2 head escarole, tip and tail trimmed, sliced lengthwise and thinly sliced crosswise
  • 1 head radicchio, thinly sliced
  • 1/3 cup thinly sliced dates
  • 1/3 cup fresh lemon juice (from 1 large lemon)
  • 1/2 teaspoon Dijon mustard
  • 1/4 cup grated Parmesan, plus several shavings
  • 1/2 cup extra-virgin olive oil
  • Freshly ground black pepper

Directions

  1. Combine the escarole and radicchio in a large salad bowl. Toss in the dates.
  2. In a jar with a tight-fitting lid, combine the lemon juice, mustard, grated Parmesan cheese, olive oil, and black pepper. Shake well to combine. Pour over the salad and toss.
  3. Grate more Parmesan on top and serve.